Pages

May 29, 2013

Bake this for dinner!


I keep reading that it is a good idea to try to eat vegetarian at least a couple of times a week.  The problem for me has always been that my kids seem to really like meat!

I stumbled on this recipe in a little flyer I picked up at Whole Foods Market a few years ago, and decided to try it.  First, it sounded like something we would all like.  Second, it was easy peasy!

I'm sharing it with you here, with a few of my own variations.  In the event that you are like me, trying to feed your family unprocessed food as much as you can, this is a great and easy place to start! 


Mexican Quinoa Bake
serves 4

1 cup white or red quinoa (pronounced keen-wah); find it with the other grains and read about its benefits here
2 cups water, plus 3 T.
1 small white onion, finely chopped
2 cloves garlic, minced
1/2 cup white mushrooms, finely chopped
1 small red pepper, chopped
I handful cilantro, chopped (leave it out if you are a cilantro-hater!)
1/2 to 1 cup of green kale or spinach, roughly chopped
1 can refried beans (try the vegetarian variety to make it even more healthy)
cumin, chili powder and fresh ground black pepper to taste

Preheat oven to 350 degrees.

Add quinoa and water to a saucepan.  Bring to a boil and reduce to a simmer, covered, for 12-15 minutes.

Meanwhile, add 3 tablespoons of water to a saute pan, and saute onion, garlic, mushrooms, red pepper and cilantro until soft.  Use more water as needed.  Add in the kale or spinach and cook until greens turn bright green.
Drain excess water and transfer to a large mixing bowl.  Add cooked quinoa and refried beans; mix well.  Season to taste with cumin, chili powder and black pepper.
You notice I didn't even bother to use a mixing bowl; I just mixed it all in the saute pan!
Coat a loaf pan with cooking spray, or line it with parchment paper.  Scoop mixture into the dish and spread evenly.  Bake 20-25 minutes, or until top is slightly crispy.

Here is what I have discovered:  don't worry if you don't have all the veggies this calls for.  I have made it without mushrooms.  I have added zucchini or more kinds of peppers.  It really is a very forgiving dish, in which you can use whatever you have on hand vegetable-wise, and it will most likely turn out just delish!


May 27, 2013

DIY Cloche

It seems everyone is decorating with cloches these days.  They're such a pretty way to display little treasures, and I want to show you how to make your own.

Your options for supplies are pretty much limited only by your imagination.  I just walked around the craft store and stacked different items on top of each other until I had the look I liked.  Here's what I used:


Supplies:

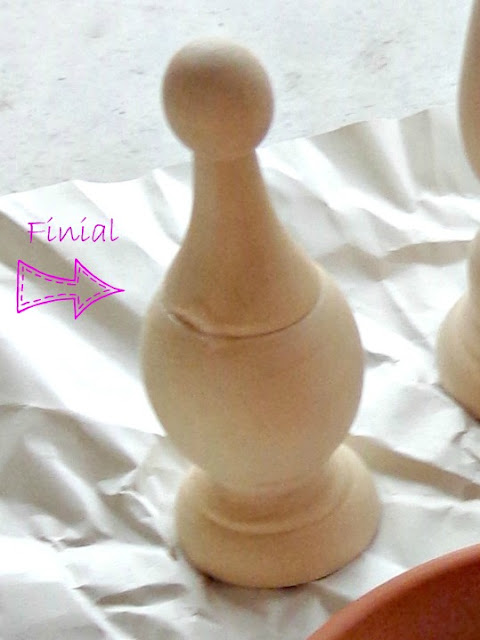
  • Wooden finial
  • Glass container (this was with the candle holders)
  • Small potted plant saucer (use what fits the lip of your glass container)
  • Paint (I used Rust-oleum metallic spray paint in oil rubbed bronze)
  • Strong adhesive (I like E-6000)
  • Optional - I also purchased a wooden candlestick to go on the bottom, but after everything was painted, I liked it better without and didn't use it.  I also wasn't sure it would be sturdy enough, so consider that too.

Paint your elements (other than the glass, of course) and let dry.

Turn the glass container over and glue the finial to the base. If you want to add a candlestick to the base, do that now.
That's it!
I put a little store-bought moss in mine, topped with a dollar store nest.  I love it!


May 24, 2013

Duct Tape Tagging


I just renewed our family's membership at our local fitness/fun center.  There are 4 of us, and we each have a key ring card that we scan when we enter the building.  I keep them all on my key ring, which is convenient.  They all look identical, which is NOT convenient. I can never find the right one when I need it, so I end up scanning all of them until I find the one I need!  (The ladies at the desk are not happy with me.) I have tried to write our names in Sharpie on each card, but that rubs off after just a few uses.  The gentleman at the front desk suggested I write names on electrical tape, since that's very sticky.  That got me thinking about other options...like duct tape!  It comes in hundreds of colors and patterns and in individual sheets or rolls.  

I allowed everyone in the family to pick their own identifying pattern.  I cut a small piece for each of our gym tags and voilá.  Now I know whose is whose!


After that, I REALLY got to thinking.  How often do my kids argue over identical items?....lunch boxes, toothbrushes, rain boots, soccer cleats, booster seats, toy baskets, Nerf guns, etc.  Well guess what?!  A few pieces of duct tape go a loooong way toward peace...even if it's temporary.


As for the dogs...who needs microchips?  I've got duct tape!


May 22, 2013

Aim High


Aim at heaven and you will get earth thrown in.  Aim at earth and you get neither.

C.S. Lewis

Think about where you're aiming today.  What are you hoping for?

Hope y'all have a great Wednesday!  


May 20, 2013

DIY A Wardrobe of Sunglasses

Because I had all the supplies on hand, my only cost was the sunglasses, which I got from the dollar store.  So my cost for FOUR NEW SUNNIES was a mere $4.00!  Even if you have to get a few supplies, you're still going to spend very little on this project.  This is an easy and fun project, and it took me less than an hour to do them all.  And I feel very chic calling them "sunnies," by the way.  Try it.  It's good!

These are the only supplies I needed to make ALL of the styles:
Get ready for the easy-peasy instructions for each:

Two-tone nail polish sunnies:

You need:
Plain solid-color sunglasses
Painter's Tape
Paper (optional)
Nail polish in a color you like

1.  I rubbed the paper against the lenses, then cut it out to use as a cover to avoid getting paint on the lens.
2.  Place paper on lenses and use painter's tape to create a design.  I added a little angle at the outside edges for interest.
3.  Paint away.  You will most likely need at least two coats.  The first coat might have you afraid you won't get enough coverage, but don't worry about that.  Just let it dry a little, then give it another coat.
Let them dry fully, remove the tape, then enjoy!
* * *
Bling-tastic Style:

1.  All you need is a pair of sunglasses (mine have a tortoiseshell pattern), some strong adhesive like E-6000, and some rhinestones (mine are 5 mm).
2.  Use a toothpick to put tiny drops of glue on the sunglasses and place the rhinestones on there.  I found it much easier to put the glue on the glasses rather than on the stones, but you do whatever works for you.
3.  Add stones until you get a pattern you like.  Try to put an odd number on each side if you're doing a similar pattern to what I did.  It just seems to look more balanced that way.
Let it dry and then go be fabulous!
* * *
Pretty Patterns:

1.  You need:  Sunglasses, Mod Podge (I used the luster kind), scissors, sponge brush, and tissue paper
2.  Coat the earpieces with Mod Podge on both sides and the edges.  
3.  (Not shown, because I couldn't take pictures while I was doing it) - Just cut a rectangle longer and wider than the earpiece, and gently adhere it.  Smooth it out and cut off loose edges, then Mod Podge over the tissue paper.  Let dry completely, then kick back and look cool.
* * *
Subtle Glitz:

1.  What you need:  Sunglasses, Mod Podge, Painter's Tape, Glitter
2.  Tape off a pattern on the earpieces and Mod Podge.  (You can go pretty thick here.)
3.  Pour glitter onto a sheet of paper and dip the Mod Podged areas into the glitter (rather than sprinkling the glitter onto the glasses).
4.  That makes clean-up and application really easy.  Just pour the excess glitter back into its container when you're done.
Let them dry, remove the tape, then go be gorgeous!


I shared this post at Debbie Doo's


May 17, 2013

Taking a little time to make a BIG difference


Typically, when we parents think of helping and volunteering in schools, most of us probably help plan parties, chaperone field trips, buy teacher gifts, maybe we go to PTA meetings.  These are all great...please continue your work!  

But there are important needs not being met in the classroom.  Times have been hard for many of our public schools lately.  Severe budget cuts have affected the way our teachers do their jobs.  Classroom sizes have increased, resources cut, standardized testing emphasized....all making it difficult for our kids and teachers to get what they need

Why not take your time and skills and help IN the classroom?  It doesn't take hours and hours of your time.  Can you give up an hour a day?  A week?  A month?  A year?!  Get IN there and help!  Having ONE safe and willing parent in the classroom divides the student teacher ratio in HALF!  Think about what that means to the kids...twice as many students are heard, touched, acknowledged, nurtured, taught, excited.  Even for a few minutes, that's a HUGE difference.

Talk to your child's teachers.  Find out what their needs are.  Make your available hours known and remind your teachers often that you're available.  Someone will take you up on the offer.  You won't regret it, and you'll have a BLAST.  


May 15, 2013

A Pretty Way to Protect Your Table


Last fall my mom and dad gave us the dining room table that  my brothers and I grew up eating on.  It is a "fancy" table from Ethan Allen, one that needs to have a bit of care taken so that is doesn't get damaged or scratched.  I've been a bit nervous with it in our house, especially with the number and variety of people that we have over on a regular basis.  You know, kids don't always think to use a coaster!


The most obvious way to protect the table is to use a table cloth.  I know, Einstein here.  However, it has proven hard to find a cloth that was long enough for this table (120"), that satisfied my aesthetic standards, AND that wouldn't break the bank!  I found beautiful cloths for $120, but that is too much for something that I want to be able to use often and clean easily.

Well, I was wandering the fabric department at Wal Mart the other day and came upon this display.


Vinyl covering, 54" wide and however long I want!  I was particularly drawn by the black and white pattern you see there, as it has a flannel back and looks like a cloth.  Only $2 a yard!  I bought 5 yards, which was plenty for the dining room table and left me a good-sized piece left over for either the kitchen table (if I want to match) or for a table outside.  Hooray!

Another idea for this fun stuff is to use either the clear vinyl or the clear with a white pattern and affix it to your table by stapling it to the underside.  Of course, you wouldn't do this with a formal table, but it would be a fun way to transform a more casual/beat-up table.


May 13, 2013

Who Are You?

I would never encourage graffiti, okay?  But on my way to work one rainy day last week, I noticed this on a fence next to a church parking lot.  Four words that say a lot.


May 10, 2013

Scrabble Family Love Decoration


One of my favorite ways to decorate in my house is to take a usual item and use it in an unusual way.  I love when some asks "Where'd you get this?" and I can respond by saying "I made it." or "I've always had it."  It feels great and it's fun!

For Mother's Day this year, I decided to make something special for my mom.  (I hope she doesn't read this before Sunday!)  She is buying a new house in a new town soon, and I wanted her to have something unique...a one of a kind piece.  So I made THIS:

Here are the supplies you'll need:
  • Scrabble board and letters
  • any strong adhesive (E6000 is always a good choice)
  • strong ribbon (I used grosgrain) 
  • large popsicle sticks (optional)
 

Once you have the supplies, the process is so simple:
  • Decide what names you want to use (I used my mom and dad, their kids and spouses, plus all of our children...15 in all).
  • Using your Scrabble tiles, incorporate all of the names onto the Scrabble board, as though you are playing a game of Scrabble.  This may be a long process - it's not easy! 
  • Once you know where each name will fit, begin gluing the letters down one at a time, making sure each tile is secure. 
  • Give the letters a chance to dry - at least several hours, preferably overnight.
  • Once the letters are dry, flip the board over and use the popsicle sticks to make the board more sturdy by gluing a row of them at the fold of the board. (This keeps the board from folding up.)
  • Cut your chose ribbon to your desired length - I did a 16 inch piece and glue the ends to the back of the board.  
  • Allow to try overnight..and voila! 

You can customize this as much you'd like:  cover the board with fabric or paper for a more decorative finish, add photos to the board, paint your letter tiles, cut the board down and have it fit into a frame...the possibilities are endless.  

I like the simplicity of the board by itself.  I think it's graphic and fun, perfect for a play room, game room, or basement. 

Please, let me know if you make this and how you do yours.  I'd love to hear about it. 


May 8, 2013

Create a Family Gratitude Journal


Back in 2009, our family started a journal in which to record our gratitude.  We set out to record at least 1,000 gifts.  (We got the idea from Ann Voskamp.)

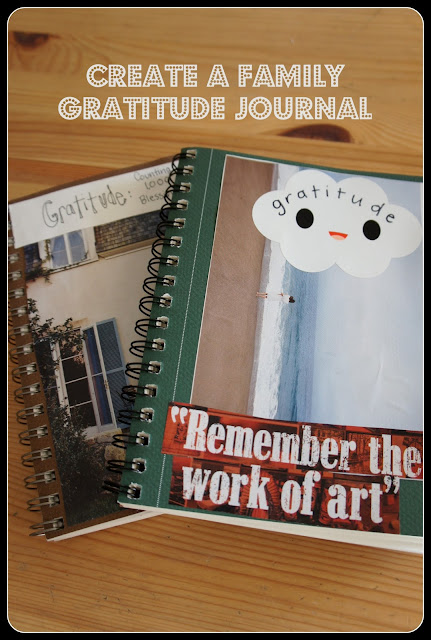
I started with just a plain sketch pad from the art store.  I decorated the front cover and random pages inside with pictures from magazines.

We started with number 1, making a ongoing list of things for which we were thankful.  That first journal took us all the way to 2013 and we made it to 1,781 gifts!


As you can see, most of the writing is mine, but sometimes my kids would get in on the act.  At dinner, we would say what we were thankful for and I would record it.  I also tried to leave the journal out on the counter or kitchen table so that anyone could record something whenever the mood struck.

I have found that the time I most need to write in the gratitude journal is when I am grumpy or things don't seem to be going my way.  Remembering all the amazing things in life will put things in perspective right away!  It is also wonderful to go back and read all that we've recorded over the years.

Best of all, did you know that all the latest research shows that the habit of gratitude does amazing things in us, like decreasing levels of stress and depression, increasing levels of determination and energy, fostering closer relationships and increasing levels of happiness!  Who wouldn't want that?!

We recently filled up that first journal, so I just bought another one and quickly decorated it with whatever was at hand.  Here it is.  I can't wait to start filling it up!