Pages

Apr 29, 2013

Keepsake Dried Flower Phone Case

My little boy likes to pick flowers from our yard to give to me.  Of course those little treasures don't last long, and then they go to the garbage.  Last week, he picked some little pink blooms and a couple of bluebonnets, and he was so sweet.  He handed them to me and said, "I knew you would like these, because they're pretty like you."  That kid sure knows what to say to a gal!

Instead of letting them get all wilted, I put them between some paper towels, then pressed them in a phone book.  Then I made this:

I had all the supplies on hand, other than the $1.00 cell phone case, so I wound up spending very little money on this project.

Want to make one of your own?  

Here's what you'll need:
Dried flowers (your own or store-bought)
Mod Podge
Mod Podge Dimensional Magic
Glitter (optional)
Phone case (mine is from the dollar store)
Scissors

1.  First, lay out the flowers on the phone in a way that you like.  Don't worry if there's overlap.  You can trim that off later.

2.  Spread a thin layer of Mod Podge on the cover.  Place the flowers down according to your plan.  Flatten them out as much as possible.  If you want a little glitter, you can sprinkle that now OR you can sprinkle it before you put the flowers down.  Your choice.

3.  Snip off any loose stems or pieces hanging over the edges.

4.  Next spread the Dimensional Magic over the whole thing, being careful to keep it from dripping down the sides.  If that does happen, you can remove it with a Q-tip dipped in nail polish remover.  The Dimensional Magic forms a hard clear coating over the whole thing for a smooth surface.

5.  It will look a little cloudy at this point, but it dries clear.

6.  Let it dry according to directions, and before you know it, you'll have a sweet and pretty phone case!


Apr 26, 2013

Bedtime Bonding - my 3 favorites

I don't know about you, but our family's days (and evenings) seem to be jam-packed with homework, projects, soccer practice, much-needed free play, chores, showering, eating....the list goes on!  Sometimes, we arrive at bedtime, and I look at my family and wonder where the day has gone.  I realize that although we may have talked all day, I feel like we have been just existing in our house together, sometimes with little personal interaction.  So in our house, no matter how chaotic the rest of the day, BEDTIME IS SACRED. 

From the day our kids came home from the hospital, bedtime rituals have been a MUST, not just an afterthought
.  Everyday, everything at bedtime happens together:  baths and showers, picking out and putting on pajamas, brushing teeth, getting water and stuffed animals and books, praying together, reading together, cuddling together.  We do not send our kids to do these things alone - we work together as a family.

My favorite part is lying in bed with each child (my husband and I switch kids every other night) and reading and cuddling and talking.  Over the years, we have developed several quiet games and activities to keep us talking and sharing.  My new favorite is one we call "My 3 Favorites".


After praying and reading and turning out the lights, my daughter and I lie next to each other.  One of us starts with the question, "What are your 3 favorite....?" and we finish with something.  We each take a turn answering each and then asking another.  Some of them are silly, some are serious, some are random (hers in particular - but hey, she's 5!), but all of them teach us about each other.  Some of our most recent favorites are:

*ice cream flavors, moments with your friends today, places in your school, pairs of socks, windows in the house (yeah, that was one of hers), reasons to smile, shirts, breakfast foods...

You get the idea.  It has become our favorite ritual, and we NEVER skip itOur kids know that it's as important as brushing our teeth and saying prayers...it's just what we do!

Do you and your family have anything like this?  I'd love fresh ideas!

Apr 24, 2013

Be a Little Bit Greener at the Grocery!

Earth Day was on Monday, in case you were wondering!  While we don't usually do anything special on Earth Day, I decided that I would pick just ONE thing that our family could do differently in order to live a little bit greener.  But there are SO MANY things we could do; which one should I choose?

Then I happened to walk into our local grocery store and I KNEW.  I saw these.


Am I alone in hating the piles of little plastic produce bags that get collected at the grocery store?  I hate to admit it, but I often end up throwing them in the trash instead of recycling them.  I have gotten pretty good at remembering my reusable grocery bags, but the produce bags still get me down!

Then I saw these little guys.  And guess what?!  Only $1.47 for each pack of 3.  An inexpensive, easy way that we can be a little bit greener, and I don't have to be overrun by annoying little bags.  What could be better?  I especially like the drawstring that will prevent runaway plums (or mangoes or apples or what-have-you).


If you were to pick ONE thing to make things greener in your family, what would it be?  


Apr 22, 2013

Anyone Can Make This Ring!

This is the easiest ring you could ever make, even if you don't consider yourself a crafter.  

You just need a ring blank, some strong adhesive (I used E-6000), and something pretty as the centerpiece of the ring.
You can get ring blanks in a variety of styles and prices.  This one was in a multi-pack and came out to about 33 cents each, and the druzy (or is it drusy?) stones were $7.99 for the five pieces, so about $1.60 each, for a total of less than 2 bucks for the finished ring!

(I got the ring blank and stones at Michael's.)

All you do is glue one of the stones to the ring blank with the E-6000, let it dry, and voila!  New ring for you!  


Apr 19, 2013

Laundry sorting solutions


I have tried to  find "the perfect solution" to the sock and underwear sorting dilemma at my house.  You know what I'm talking about - missing socks, hours of sorting, folding, matching, scrambling to find a clean pair...you know the drill. Below I've listed what I've tried and why it didn't work:
  • I tried washing each kid's laundry totally separately.  Why doesn't this work?  Washing the colors and whites separately makes two ridiculously small and wasteful loads, but when I don't separate the whites from the colors, the whites are dingy.  Also, my kids throw their dirty clothes anywhere they can so their clothes aren't always in the correct laundry bag!
  • I tried keeping their socks and underwear in a basket in the hallway and making them pull out their own items, fold and put them away on a regular basis.  Why doesn't this work?  Do I really have to say what didn't work about that? 
  • I tried just doing it all myself simply because I don't trust anyone else in my house to get it done.  Why doesn't this work?  This actually does work, as you can imagine, but I just don't like it.

THIS is my new solution. 


Each person (including the grown ups) has a lingerie bag hanging with our laundry bags in our closets.  I found these Container Store bags that we love.  In those bags go our socks and underwear after we take them off.  When the bags are full, I zip them up, wash and bleach them all together, dry them, and throw them back into our rooms.  Each person has clean and matching socks and underwear, all together, nothing lost.  

Why does this work for us?
  • We also have these large laundry bags hanging on our doors already, so our lingerie bags just hang with them.  I use a clip hanger with each to keep it on top and easily accessible.
  • I have 2 bags per person, so that one is clean and one is dirty...kind of like a second set of bedsheets. 
  • My kids are notoriously bad at taking off socks and leaving them balled in shoes or pants....or taking off underwear with pants and having them stay IN the pants!  If the socks and underwear have a different place, they have to separate them.)
  • They dryer CAN'T eat the socks.
  • My kids know that if they're suddenly "out of socks", it's their responsibility to go to the bag and sort them.  
Try it!  It's inexpensive, a huge timesaver, and it helps make the kids responsible for their stuff.  I LIKE THAT! 


Apr 17, 2013

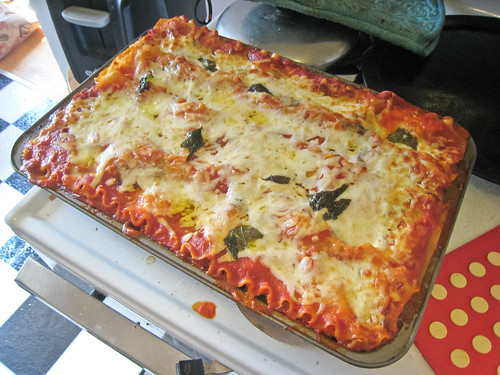
Healthy Lasagna that Tastes Like It's Not

If you are like me, you may be trying to get your family to eat more whole foods and less processed foods.  Maybe you'd like to get more leafy greens into your family's diet.  We all need more leafy greens!  

Here is a delicious and simple lasagna recipe that is much healthier than your mom's recipe (unless your mom is a health guru).  I have been serving this for years, and it always gets rave reviews!


finished lasagna
photo credit
I found this recipe in Real Simple many years ago, and it has become a go-to for us.

My Variation of Real Simple's Vegetarian Lasagna


1lb soft tofu (keep reading!  it's worth it!)

1/2 c. grated parmesan (I use fresh, but you can easily use the stuff in the jar)
2 eggs
3 cloves garlic, minced
2 T. each fresh basil, thyme and oregano OR 2 t. each of dried (OR if you are anything like me and never sure if you will have exactly what you need on hand, just use any combination of these)
1/4 t. salt
1/8 t. ground pepper (or more...I love pepper!)
32 oz. tomato sauce (canned/jarred is fine, but it will taste so much better if you make your own. I use my friend Jen's EASY recipe which you can find here.)
no-boil lasagna noodles, white or whole wheat
2-3 cups baby spinach
one package of shredded mozzarella
Heat oven to 375 degreesCombine tofu, Parmesan, eggs, garlic, herbs, salt and pepper in a medium bowl.


Coat a 13 X 9 pan with cooking spray.  Spread about a cup of sauce in pan and arrange a layer of noodles on top.  Spread with half the tofu mixture; top with half the spinach, a third of remaining sauce and a third of the mozzarella. Repeat layers, ending up with noodles, sauce and cheese.  


Cover with aluminum foil and bake for 30 to 35 minutes.  Let stand for at least five minutes before you cut it so it has a chance to set.

I like to serve this with a salad and a loaf of whole grain crusty bread from the grocery store bakery.  

If you want to be really sneaky, just don't mention that our secret ingredient!  You will be feeding your family well, and they won't know what they're missing!

Apr 15, 2013

Markers on Mugs - Does it Really Work?

I'm always seeing this idea on the internet for using Sharpie markers to personalize a mug.  Great idea, right?  It seems the consensus is that it's a great idea, but it doesn't actually work after the piece has gone through the dishwasher.

I decided to take what seemed like the most logical suggestions and put them together in a major test of various types of markers and their staying power.
My Supplies:
* I used plain rubbing alcohol to clean off a white dollar store plate.  I put a number and a star representing each marker.
Here we have:
1.  Black Sharpie (Original)
2.  Blue Sharpie (Original)
3.  Vitrea 160 Marker (Glossy Finish)
4.  Black Sharpie Laundry Marker
5.  Colored Fabric Marker
6.  Colored Fabric Marker
7.  Every Color From My Dollar Store "Permanent Markers"

* I waited for 24 hours to let it cure.  So far, so good.

* Next, I put the plate into a COLD oven, heated it to 425 degrees, set the timer for 30 minutes AFTER it reached 425. Then I turned the oven off, but left the plate in, to avoid cracks that could result from removing it hot.

When it came out, there had been some changes!
1. Black Sharpie looks okay but has lightened.
2. Blue Sharpie is no longer blue!
3. Vitrea holding up well.
4. Sharpie laundry marker still looks good.
5. Purple fabric marker smeared and lightened.
6. Orange fabric marker smeared and lightened.
7. Dollar store markers - The red is faded but alive, and the black still looks great.  The others all but disappeared.

Next I used a wet Q-tip to try to rub or scratch off the color. The results:

Finally, it was time for a trip through the dishwasher, followed by another round with the Q-tip.  Here's what happened:

The verdict?

I think it's pretty clear.  The Vitrea marker (#3) was the only one that passed all the tests.  This one is made specifically for glass and has another version made for porcelain.  Reviews I read indicated that the porcelain marker tends to clump and that people had good luck using the 160 on plates and mugs.  

According to the directions, this marker should be dishwasher safe WITHOUT putting it in the oven after a few days.

It's fun to find new uses for everyday items, but sometimes specialty items are made for a reason.  The Vitrea pens are NOT expensive, contrary to what I had read online.  You can get them for under $5 at Michael's, and they come in a wide range of colors, in both glossy and frosted finishes.  

And, no, this is not an ad for Vitrea.  I bought the marker with my money and got no compensation at all for this post. I just wanted to see what would work and what wouldn't.  

So now I know.  Then I decided to make something more useful than that ugly plate I experimented on.  
Dollar store mug, Vitrea marker.  Place white label stickers randomly on mug and trace around, then remove the stickers. Next I put little groups of dots randomly around the big dots.  Ta-da!  A fun mug that I KNOW can go in the dishwasher.


Apr 12, 2013

Stuff it!


I think my children may be hoarders!  Ok, maybe not true "hoarders", but something is going on with these people. Almost without fail, I find my children (ages 9 and 5) to be virtually paralyzed when it comes to cleaning and straightening their rooms.  So naturally, they avoid it at all costs.  For example:  as I type now, there is quite the variety of items on the floor in my son's room, that include but are not limited to:
Legos, books, a light saber, 4 pairs of pajamas (of which you will not find a single matching pair), a geode, a rainbow of popped balloons, the backs to Disney World pins.... you get my point. 

When it comes to cleaning, I am usually of the mind that the fewer times you touch an item, the more efficient your cleaning will be.  In other words, don't pick up a shoe and put it on the floor in your bedroom, only to put it in the closet later.  Take it all the way there now and save the extra step!  But with my kids, they get overwhelmed. 

We have worked out a new method, and it seems to work.  Recently, I discovered these bins at Home Goods, but obviously any container would work.  

Instead of tackling a full cleaning everyday, at bedtime the kids take their little"stuff" and throw them in the "stuff" bin.  In a matter of a few minutes, the floors are cleared, rooms are straightened, and there was little effort required.  Then once a week, usually Sunday evening, we all work together to put all of their "stuff" in the correct place.  My kids handle this better.  They can manage a bin more than an entire room.  

What are your family's strategies for cleaning?  Are you, too, living with mini-hoarders?


Apr 10, 2013

A Year-Round Tree

Last fall, my dear neighbor, Denise (you can read about her in this post), found a decoration at our local discount store and she just HAD to get it for me!  We had seen an expensive version in a cute boutique earlier, and she knew I would love this little metal tree.


Here it is all dressed for Easter.
At first glance, this may seem like a winter or Christmas decoration.  After all, it looks like a fir tree, right?  

Not so fast!  Here what I did with it last fall when Denise first dropped it at my front door (please forgive the terrible phone picture):  I put a garland of foil fall leaves on it.  This was good for September through November (let's just ignore the fact that only maybe two weeks in those months actually FEEL like fall here in Texas...but I digress).

Then came Advent (the season leading up to Christmas) and Christmas.  We took off the fall leaves and used it to hang our Advent ornaments.  I wish I had taken a picture! These were up until early January.  You might want to do something more traditional, like tiny Christmas balls or a garland of tiny lights or (I'm getting ideas, here) vintage ornaments from your local junk/antique store!  

Over Christmas vacation, the kids and I made some wintery crafts.  I wanted to use colors that weren't necessarily Christmasy so that I could keep them up for longer.  Here is what we came up with.


Those fun things were up until March, when it began to be spring!  Then, I found our Easter decorations and also received some new ones from my  mom.  So at the  moment we have this in the dining room.


You may not know that the Easter season is actually 50 days (according to the church calendar)!   I may keep the Easter decorations up for another month or so, as spring will last at least that long!

What will I do with the tree come summer?  I'm thinking American flags and some sparkly things for Independence Day.  Even just some tiny white lights would look festive and summery as move into the hot months.

What ideas do you have?  Do you change your decorations according to the season?  Or is that too fussy for you?  Let me know in the comments!


Apr 8, 2013

Crawly Experiment for Kids

Photo Source: The Telegraph
I ran across this photo at The Telegraph and was inspired to do an experiment with my little guy.  Those look like huge colorful globs, but they're really just colored sugar water drops on a paper plate.  (We used red, yellow, green and purple.) Just mix up sugar and water with different colors of liquid food coloring, put little drops on a dish, and then place it in an area with lots of little ants.

We didn't have this many ants, which was bad for the experiment but good for our backyard.  The original text with this photo said they found the ants preferred yellow and green.  Ours seemed to go for the red, but really they tended to just go for whichever color they came upon first.  We watched for a long time to be sure.

Also, I didn't think the little solid black ants in our yard would look like those in this photo.  However, after they drank for awhile, they did get big ol' bellies that went transparent like in the photo above, and you could easily see the different colors in them depending upon which drop they were drinking from!

While I'm not normally crazy about ants, the little guy and I had a lot of fun with this experiment, and he talked about it a lot. 


I think it could open the door to lots of educational concepts as well.


Apr 5, 2013

Lunchbox Time Savers


Who wants a time saver?  ME ME ME!!!

Every year, the weekend before school starts, a friend of ours hosts a huge pool party at her house.  Two years ago was my first time to attend.  I expected to chat with friends, meet a few new people, yell at my kids to have good manners, fail miserably at avoiding the dessert table... Little did I know that a conversation with my friend Michele would change my life.  I do not exaggerate.  This little nugget of information has made a HUGE difference in our family's mornings.  Her revelation? 


Pre-made, packaged, and frozen sandwiches for the kids' lunches


That's it!  It's so simple but SUCH a great idea.  And it's not hard.  Just make the sandwiches, place them in individual baggies, and store them in the freezer.  Each morning, your kids pull out a sandwich, place it in the lunchbox, and by the time they get to lunch, the sandwich will be thawed and ready to eat.  

There's no major step-by-step process.  Here are some of MY observations, though, that have worked for our family:
  • Get the kids involved.  Create an assembly line and make them help.  It's for them, after all!
  • We do this every 2-3 weeks, usually on a Sunday afternoon. 
  • I like to use sandwich cutters.  Pampered Chef's circle cutter is my personal favorite, but we use lots of shapes.  You can find them in any grocery store.
  • My kids prefer peanut butter combinations (Nutella, jelly, honey, bananas, etc) but this can work with any kind of filling.
  • Use TWO sizes of freezer bags - a sandwich size for each individual sandwich, and a large bag to hold them all in the freezer.  The double insulation helps to prevent ice from forming on the sandwiches.  That makes them soggy (ick) for lunchtime.
  • If we make several different varieties, I sort them into large bags and label each for easy pickings in the morning.  
  • What I love most about this is that it allows my kids to have a say in what they eat each day (within reason, of course).  There's no fighting what Mommy makes, freaking out over something they don't like, and no rush to get it made in the mornings.
AAAAAHHHHHHH!


Apr 3, 2013

Four Steps to a Great Parent/Teacher Relationship

How do you feel about communicating with your child's teacher?  I remember when our oldest son started pre-school, and I felt like a little kid myself as I attended my very first parent/teacher conferences as a parent.  Who was the expert on my child, me or the teacher?  How much input did the teacher want from me, and how much was I just supposed to listen?

As a teacher myself, I often put myself in the shoes of my child's teacher as I approach conferences and even everyday communication.  And with four kids in school, we have had to negotiate some difficult conversations with a few teachers over the years!  


Now our oldest is in high school, and I have certainly learned some good lessons about communicating with teachers.  Here are four steps to establishing a great working relationship as you communicate with your child's teachers.

1.  Start off by giving the benefit of the doubt to the teacher.  

Listen, I know your child is perfect.  However, sometimes she might exaggerate.  Sometimes he might not represent things correctly.  You will show respect for the teacher when you listen carefully to her perspective.   As tempting as it is, don't always assume your child can do no wrong.


2.  Words of affirmation go a long way.

Who doesn't love to hear nice things about themselves?  A few kind words at the beginning of an email or a phone call establish a friendly tone and will put the recipient at ease.  As a teacher, I always try to begin a conversation with parents by complimenting their child.  As a parent, I show that the teacher and I are on the same team when I find something positive to say from the get-go.

3.   Don't be afraid to be the expert on your child.

You have known your child for longer than the teacher. You see her in all kinds of situations, and have a parent's intuition about your child.  As a teacher, I love to hear stories and anecdotes about my students because it helps me know them as people and understand them as learners.  Share your knowledge of your child with his teacher.  If you have an idea or insight about his or her learning, don't be afraid to communicate it to the teacher.
Conversely, listen carefully to the teacher's take on your son or daughter.  Often times, teachers and other adults notice important aspects to our children that we parents might overlook or dismiss.


4.  More communication is better than less.  

Most teachers are teachers because they love children and have a passion for helping them learn and succeed.  They can do that job best when they work in tandem with parents and families.  Don't make the mistake of assuming your child's teacher doesn't want to hear from you - he or she does!  Never hesitate to communicate with your child's teacher, whether by a note in your child's folder, an email or a quick phone call.  Did your child have a hard morning?  Shoot a heads-up email to the teacher, so she can be prepared.  Is your child struggling with the homework on a regular basis?  Instead of getting frustrated (well, maybe in addition to getting frustrated), get in touch with the teacher and see if she has any insights.  Remember, you both want the very best for your child.  
As children get older and move into middle and high school, communication between parents and teachers falls off precipitously.  This can be okay as the students take on more and more responsibility for their own learning and work.  However, I recommend establishing at least email contact with all of your older child's teachers!  Even just a quick check-in, or a line to say that your child mentioned something he learned in class can give the teacher a good vibe about you and your child. 


Teachers and parents, what would you add to this list? 


Apr 1, 2013

Duct Tape and Paperclip Necklace Tutorial


I've been using a paperclip to hold the cut edge of a roll of duct tape I had, and it made me think about paperclip chains and other projects I've seen with these materials.  Shortly after, I found gold tape at the craft store and realized I could do a fun project with it.

You or your kids can try this fun project, and here's all you need:

  • Duct (Duck) tape in the color(s) of your choice
  • Paperclips (I used small gold colored clips, but you can use any size and finish you like.)
  • X-acto Knife or very sharp scissors
  • Jewelry clasp and Jump Ring (optional)

Connect the paperclips together to form a chain.  Hold it around your neck to get the size you like.  I made two chains with 21 clips, two with 23 clips, and two with 25 clips.  I made one red and one gold of each.
Measure and cut the tape into the number of strips you'll need.  Be sure you leave room on either end of the clip to form a little loop.  You don't need much to wrap around.  Something like this should do:
Then you'll just wrap the clips.  When you're done, you can connect with jewelry clasps if it's not big enough to fit over your head.  Wear it longer or shorter, depending on the look you like.  Voila!